Monday, December 17, 2012

Marinara Magnifica


As a former vegetarian I love the idea of Meatless Monday as I’m always looking for recipes that satisfy without the addition of meat.  This marinara recipe is one of the first foods my husband requests as the weather turns cooler and he’s less willing to grill outside.  It’s perfect for freezing and breaking out for a quick weekday meal.  I guarantee you won’t miss the meat with this recipe.


Marinara Magnifica (from Cooking Light)

1 tablespoon olive oil
6 cups chopped onion (about 3 medium)
1 tablespoon sugar
1/2 cup dry red wine
1 tablespoon extra virgin olive oil
2 teaspoons dried oregano
1 teaspoon salt
1/2 teaspoon dried thyme
1/2 teaspoon dried marjoram
1/2 teaspoon dried basil
1/2 teaspoon freshly ground black pepper
1/4 teaspoon crushed red pepper
6 garlic cloves, crushed
2 (28-ounce) cans crushed tomatoes, undrained
2 (14.5-ounce) cans diced tomatoes, undrained
2 (6-ounce) cans tomato paste

Heat oil in a Dutch oven over medium heat; add onion and sugar. Cook 30 minutes or until golden, stirring occasionally. Stir in wine; cook 1 minute. Add remaining ingredients; bring to a boil. Reduce heat, and simmer 3 hours, stirring occasionally.

Makes 9 cups of sauce.

Monday, November 26, 2012

Chocolate Chip Cookie Bars


First, an apology for being so lax in my posting for the past few months.  I gave birth to my daughter Madeline in September so I’ve been a bit busy since then.  We had a lot of sleepless nights at the beginning so if I had any free time it was spent napping, not baking!  But now that she’s 2 ½ months we’ve started establishing a bit of a schedule.  I’ve learned to take full advantage of any time that she’s napping or when my husband is home to watch her. 

This past weekend was Thanksgiving and I was all set to post a recipe that I made for Thanksgiving dessert.  Unfortunately it turned into a bit of a disaster (I’ll blame it on being out of practice) and most of the results went into the garbage.  I had the chance to redeem myself on Sunday when our friends stopped by with their young daughter.  I planned to make these Salted Caramel Chocolate Chip Cookie Bars, only to realize I didn’t have caramels that morning.  Really, the baking gods were working against me this weekend.  I decided to just leave the caramel layer out and add in a mix of dark and white chocolate chips to jazz the bars up a bit.  I also added a sprinkling of salt on top to balance the sweetness.  The bars ended up turning out great, and they were done in under an hour.  With a newborn in the house, that’s essential!


Chocolate Chip Cookie Bars (adapted from Brown Eyed Baker)

2 1/8 cups all-purpose flour
½ teaspoon baking soda
½ teaspoon salt
12 tablespoons unsalted butter, melted and cooled to room temperature
1 cup light brown sugar
½ cup granulated sugar
1 egg
1 egg yolk
2 teaspoons vanilla extract
2 cups chocolate chips (I used both white and semi-sweet)
Sea salt for sprinkling over bars


Preheat oven to 325 degrees. Grease a 9-inch square pan; set aside.

In a medium bowl, whisk together the flour, baking soda, and salt; set aside.

Using an electric mixer, mix together the melted butter and sugars on medium speed until combined. Add the egg, egg yolk, and vanilla extract and mix until smooth. Slowly add the dry ingredients and mix on low, just until combined. Stir in the chocolate chips.

Press the cookie dough into the prepared pan, smoothing the top with a spatula. Sprinkle the bars with sea salt.

Bake the cookie bars for 30-32 minutes, or until the top of the bars are light golden brown and the edges start to pull away from the pan. Cool the bars on a wire rack to room temperature, then cut into squares and serve. Store leftovers in an airtight container at room temperature.

Sunday, July 29, 2012

Blueberry Streusel Scones


Now that our local farmer’s market has opened for the season we come home with a bounty of produce every weekend.  My fridge was overflowing with Jersey blueberries so I figured I should find a way to put them into a breakfast treat.  I decided to make scones with blueberry streusel topping after I came across the recipe from Joy of Baking.  They were easy enough to make, though it was hard to transfer them over to the baking sheets after cutting the circles into wedges.  I ended up just reshaping them a bit once they were on the baking sheets.  Dennis really liked these, especially since they had the crumbs on top.  If you’re looking for a way to use the best of summer produce, I highly recommend you give these a try.

 Blueberry Streusel Scones (from Joy of Baking)

2 cups all-purpose flour
1/3 cup granulated sugar
2 teaspoons baking powder
1/8 teaspoon salt
6 tablespoons chilled, unsalted butter, cut into pieces
1 cup fresh blueberries
1 large egg, lightly beaten
1 teaspoon pure vanilla extract
1/2 cup cream or milk

Brushing tops of scones:

Milk or Cream

Streusel Topping:

1/4 cup brown sugar
1/4 cup all purpose flour
1/2 teaspoon ground cinnamon
2 tablespoons chilled unsalted butter, cut into pieces


Preheat oven to 400 degrees and place rack in middle of oven.  Line two cookie sheets with parchment paper or Silpat.

In a large bowl, whisk together the flour, sugar, baking powder and salt. Cut the butter into small pieces and blend into the flour mixture with a pastry blender or two knives. The mixture should look like coarse crumbs. Gently fold in the blueberries.  In a small measuring cup combine the milk, beaten egg and vanilla. Add this mixture to the flour mixture and stir just until the dough comes together. Do not over mix the dough or the scones will be tough.

Transfer the dough to a lightly floured surface and knead the dough gently four or five times and then pat the dough into a circle that is about 7 inches round and about 11/2 inches thick.  Cut this circle in half, then cut each half into four pie-shaped wedges. Place the scones on the baking sheets. Brush the tops of the scones with a little cream or milk.

For the Streusel Topping: In a small bowl whisk together the sugar, flour, and cinnamon.  With a pastry blender or two knives, cut in the butter until crumbly.  Top each scone with a teaspoon or two of the streusel mixture.

Bake the scones until nicely browned, about 18 - 22 minutes or until a toothpick inserted in the center of a scone comes out clean.  Transfer to a wire rack to cool slightly.

Makes 8 scones.

Tuesday, July 10, 2012

Grilled Tomato and Mozzarella Pizza


Dennis and I have a Friday night tradition of making our own pizza.  Usually that involves using premade pizza dough from Trader Joe’s, topping it with sauce and mozzarella and throwing it in the oven.  Now that the summer’s here though, we wanted to branch out and try our hand at grilling pizza.  The difference between this and oven-baked pizza is something that’s hard to put into words, but I believe we’ve found a new way to enjoy pizza.  The freshness of the tomatoes and basil, not to mention the saltiness of the dough and cheese just provides an unbeatable combination.

I’ve included the dough recipe from The Barbecue Bible, but you can use any refrigerated premade dough and just throw that on the grill.  I really did feel that the dough does add a lot to the enjoyment of the pizza, but it involves planning ahead, not the easiest thing to do in a busy week.  I love that this recipe takes advantage of local summer produce like tomatoes and basil.  This recipe is really just a jumping off point; it’s so versatile you can adjust the toppings to whatever you’re in the mood for.  So if you’re looking for something other than burgers and chicken to throw on your grill, try this out.  It may make you a convert to firing up the grill instead of the oven when you have a craving for pizza.

Grilled Tomato and Mozzarella Pizza (adapted from The Barbecue Bible by Steven Raichlen)

For the dough:
1 cup warm water
1 envelope active dry yeast (2-1/2 teaspoons)
1 teaspoon sugar
2 teaspoons coarse (kosher or sea) salt
3 tablespoons fine cornmeal
3 tablespoons whole-wheat flour
1 tablespoon extra-virgin olive oil, plus oil for the bowl
3 to 3-1/2 cups unbleached all-purpose flour, or as needed

For the pizza:
1 large tomato, cored
Extra-virgin olive oil
2 to 3 cloves garlic, finely minced or crushed
Coarse salt (kosher or sea) and freshly ground black pepper, to taste
2/3 cup shredded Mozzarella (We found the easiest way to grate the cheese was to put it in the freezer for about 20 minutes to firm it up before grating)
1/3 cup freshly grated pecorino Romano cheese
Fresh basil leaves

Place the water in a large bowl and add the yeast and sugar. Stir to dissolve and let sit 5 minutes, then stir in the salt, cornmeal, whole-wheat flour, and oil. Gradually stir in enough all-purpose flour to form a dough that comes away from the sides of the bowl. (You can also mix the dough in a stand mixer.) Knead the dough on a floured work surface, or in a food processor or mixer fitted with the dough hook, until smooth and elastic. The dough should be soft and pliable, but not sticky. Kneading should take 6 to 8 minutes.

Lightly oil a large bowl. Place the dough in the bowl, brush the top with oil, and cover loosely with plastic wrap or a kitchen towel. Let the dough rise in a warm, draft-free spot until doubled in bulk, 1 to 2 hours. Punch down the dough.

Let the dough rise until doubled in bulk again, 40 to 50 minutes. Punch it down.
Divide the dough into 2 equal pieces. Shape each into a ball, then flatten them slightly so they resemble thick disks.


Preheat your grill to high.  Cut the tomatoes crosswise into thick slices. Brush each slice with oil, and season with salt and pepper. Quickly sear the tomato slices, turning with a spatula, about 2 minutes per side. Transfer to a plate and let cool.

Generously oil a large baking sheet and place one disk of dough on it. Use the fingers and palms of your hands to stretch out the dough.  We couldn’t get the dough to fit the entire baking sheet, so just stretch it as much as you can without the dough breaking.  Then do the same for the second disk of dough.

Using both hands, gently lift the doughs from the baking sheets and drape them onto the grill. Within a few minutes, the underside of the doughs will crisp, darken, and harden, and the top will puff slightly. Turn the doughs over with tongs or two spatulas and move them back to the baking sheet.

Quickly brush the top of the pizzas with oil. Top the pizzas with garlic, tomato slices, cheese, and basil leaves.  Season with salt and pepper.

Place the pizzas onto the grill. Cook until the undersides are slightly charred and the cheese is melted on top, 2 to 4 minutes.

Remove the pizzas from the grill, cut into serving pieces and enjoy!

Sunday, June 24, 2012

Fudge Raspberry Brownies


Dennis’s birthday was a few weeks ago (yup, we’re both June babies) so I thought I’d make him something with his favorite flavors, raspberry and chocolate.  He loves anything in brownie form, so I just plugged those terms into Google and picked this recipe based on the stellar reviews.

Holy moly, these brownies really hit the mark.  They’re deliciously chocolaty with the perfect balance of raspberry preserves to sweeten them up.  My co-workers gobbled them up – good thing I brought in enough so everyone could have two.  When I asked Dennis how he liked his birthday treat he summed it up with one word: “Yum!”  Is there any higher praise than that?

Fudge Raspberry Brownies (adapted from Food.com)

6 ounces unsweetened chocolate
1 cup butter
2 cups sugar
4 eggs
2 teaspoons vanilla
1 1/2 cups flour
1/2 teaspoon baking powder
1 cup chocolate chips (I used a mix of semi-sweet and raspberry chocolate chips)
3/4 cup raspberry preserves

                                                                                                               
Preheat oven to 350.

In a large bowl, melt together butter and chocolate in a microwave; With a wire whisk, beat in sugar, eggs, and vanilla - Let cool slightly; Gradually stir in flour and baking powder just to combine; Fold in chocolate chips.

Spread about 3/4 of the batter evenly in a 13" x 9" x 2" pan that has been coated with a non stick spray.  Carefully spread raspberry preserves on top of the batter; Drizzle remaining batter evenly over preserves swirling top lightly with a spoon.  Gently smooth top.

Bake for about 24 – 30 minutes or until the top is slightly puffed and a toothpick inserted in the center comes out clean.

Cool completely in the pan on a rack before cutting.

Monday, June 11, 2012

Peanut Butter Fudge Cookies


One of my favorite foods is peanut butter (beaten out only by ice cream).  When I was younger, my go-to lunch was a peanut butter sandwich – simple yet perfect.  I decided to look for a recipe this week that incorporated my love of peanut butter, but wasn’t just a plain Jane peanut butter cookie. 

If you’re looking to treat a peanut butter lover in your life, you can’t go wrong with this cookie.  With the addition of cocoa powder and chocolate chips these cookies definitely live up to the “fudge” part of their name, while allowing the peanut butter to shine through.  People at work loved these cookies and even asked me for the recipe.  Anytime someone loves a cookie enough to request the recipe I know it's a keeper.

Peanut Butter Fudge Cookies (adapted from The All-American Cookie Book by Nancy Baggett)

2 ounces unsweetened chocolate, broken up
2 ½ cups flour
½ teaspoon salt
¼ teaspoon salt
1 cup plus 2 tablespoons peanut butter (I used a mix of smooth and crunchy)
1 ½ cups packed light brown sugar
1/3 cup sugar
1/3 cup cocoa powder
1 cup unsalted butter, slightly softened
2 eggs
2 teaspoons vanilla extract
1 cup bittersweet chocolate chips

                                                                                                               
Preheat oven to 350°.

In a small bowl, microwave the unsweetened chocolate on 50% power for 1 minute.  Stir well and continue microwaving, stirring at 30-second intervals.  Stop microwaving before the chocolate completely melts and let the residual heat finish the job.

In a medium bowl stir together the flour, baking soda, and salt; set aside.  In a large bowl, with an electric mixer on low, then medium speed, beat together the melted chocolate, peanut butter, brown sugar, sugar, and cocoa powder until well blended.  Add the butter and beat until very well blended and smooth.  Add the eggs and vanilla and beat until fluffy, about 2 minutes.  Beat or stir in the flour mixture, then the chocolate chips, just until incorporated.  Chill the dough for about 15 minutes.

Scoop the dough by tablespoonfuls onto lined baking sheets.  Using the tines of a fork, firmly press down each ball horizontally and then vertically until the ball is about ½ inch thick.

Bake the cookies for about 8 to 11 minutes, or until just barely firm in the center.  Transfer the sheet to a wire rack and let stand until the cookies firm up, about 1 to 2 minutes.  Transfer the cookies to a wire rack and let stand until completely cooled.

Makes about 36 cookies.

Monday, June 4, 2012

Chocolate Chip Strawberry Oatmeal Cookies


The warm weather has arrived in the Northeast, which means we’re officially in the swing of barbeque season.  This is by far my favorite time since Dennis considers himself a grill master in training so he takes over most of the cooking.  We had a few friends over Memorial Day weekend and I was looking for a cookie that we wouldn’t be too full to eat after pigging out on hot dogs and hamburgers.  This cookie is from Cooking Light but it definitely doesn’t taste “light.”  It gets some sweetness from the dried strawberries, but it’s also filled with semi-sweet and white chocolate chips.  I ordered the dried strawberries from Nuts.com, but if you can’t find them feel free to substitute in your dried fruit of choice.  These cookies make the perfect ending to any summer day.

Chocolate Chip Strawberry Oatmeal Cookies (adapted from Cooking Light)

3/4 cup all-purpose flour
1 cup regular oats
1/2 teaspoon baking soda
1/4 teaspoon salt
3/4 cup packed brown sugar
1/4 cup butter, softened
1 teaspoon vanilla extract
1 large egg
3/4 cup coarsely chopped dried strawberries
1/3 cup white chocolate chips
1/3 cup semi-sweet chocolate chips

Preheat oven to 350°.

Lightly spoon flour into a measuring cup; level with a knife. Combine flour, oats, baking soda, and salt; stir with a whisk. Place sugar and butter in the bowl of a stand mixer; beat at medium speed until well blended (about 3 minutes). Add vanilla and egg; beat well. Gradually add flour mixture, beating until blended. Add strawberries and chips; beat at low speed just until blended.

Drop dough by tablespoonfuls 2 inches apart onto lined baking sheets coated with cooking spray. Bake at 350° for 10-12 minutes, or until lightly browned. Remove from oven and cool on pan 1 minute. Remove cookies from pan; cool completely on wire racks.

Monday, May 21, 2012

Chocolate Shortbread Fingers


The month of May has been rather hectic for us, which hasn’t left much time for baking.  This past weekend we had a wedding where we stayed overnight so by the time we got back on Sunday I was looking for something that wouldn’t take long to whip up.  These Chocolate Shortbread Fingers fit the bill as they have a minimal number of ingredients and only bake for 20 minutes.  Plus it’s always nice when you can just throw one baking sheet in the oven and be done with it.

I appreciated the simplicity of these cookies – nice and chocolaty with hint of cinnamon.  They’re not as gooey as Dennis would like (they are shortbread, after all), but the flavor is spot on.  When you’re looking for a simple but attractive cookie to feed a crowd, it would be hard to beat these.

Chocolate Shortbread Fingers (adapted from Martha Stewart’s Baking Handbook)

3 sticks unsalted butter, room temperature
2 ½ cups + 2 tablespoons flour
4 ½ tablespoons Dutch-process cocoa powder (I used 3 tablespoons of Dutch-process, then used this Black Onyx cocoa for the rest to really bring out the chocolate flavor)
Heaping ½ tsp. ground cinnamon
½ teaspoon salt
¼ teaspoon baking soda
1 cup superfine sugar (I just took regular granulated sugar and put it in the food processor for about 30 seconds)
Granulated sugar, for sprinkling

Preheat the oven to 325.  Butter a 12 x 8 inch rimmed baking sheet and line with parchment paper, leaving a 10inch overhang on long sides.  Set aside.  In a medium bowl whisk together flour, cocoa, cinnamon, salt, and baking soda until combined. 

In a mixer beat the butter and superfine sugar on medium-high speed until light and fluffy, 3-4 minutes.  Add flour mixture and beat on medium speed until just combined.

Spread dough evenly in the prepared pan, either with an offset spatula (this always gives me problems) or patting down with your fingers using Saran wrap.  Chill in the fridge or freezer until firm, about 15 minutes.  Prick dough all over using a fork and bake until just firm to the touch, about 20 minutes.  Transfer to a cooling rack.  While still hot, cut the shortbread into pieces.  Sprinkle with granulated sugar. 


Monday, May 7, 2012

Slow Cooker Chicken and Dumplings


Spring started out rather warm in the area, but recently it’s been pretty dreary.  On one of those rainy Sundays Dennis and I decided to try out a Chicken and Dumplings recipe, since that’s one of his favorite stews.  This recipe came from a slow cooker cookbook, but if you wanted to do it on a weekday you would have to prepare most of it the night before.  You could just dump it in the slow cooker that night, leave it in the fridge, then plug in the slow cooker the following morning.

I loved the way this recipe turned out – it not only warmed us up but also tasted great.  Be warned that this makes a lot of servings.  We each had a big bowl that night, and it also provided me with lunch for the rest of the week.  I’m hoping the cooler weather is on its way out, but if not at least I have an excuse to make this again.

Slow Cooker Chicken and Dumplings (from Slow Cooker Revolution)

Stew
2-3 pounds boneless, skinless chicken thighs, trimmed
3 tablespoons vegetable oil
2 onions, minced
2 celery stalks, sliced ¼ inch thick
6 garlic cloves, minced
1 tablespoon tomato paste
½ teaspoon dried thyme
1/3 cup flour
1/4 cup dry sherry
4 ½ cups low-sodium chicken broth
4 carrots, peeled and sliced ¼ inch thick
2 bay leaves
1 cup frozen peas
3 tablespoons fresh parsley

Dumplings
2 cups all-purpose flour
1 tablespoon baking powder
1 teaspoon salt
1 cup whole milk
3 tablespoons unsalted butter

Dry the chicken with paper towels and season with salt and pepper.  Heat 1 tablespoon of oil in a 12-inch skillet over medium-high heat just until smoking.  Brown half of the chicken lightly on both sides, 5-8 minutes, then transfer to a bowl.  Repeat with 1 tablespoon more oil and remaining chicken, and transfer to bowl.

Heat remaining tablespoon oil over medium-high heat until shimmering.  Add onions, celery, garlic, tomato paste, and thyme, cooking until vegetables are softened and lightly browned, 8-10 minutes.  Stir in flour and cook for one minute.  Slowly whisk in sherry, scraping up any browned bits.  Whisk in 1 cup broth, smoothing out any lumps, and transfer to slow cooker.

Stir remaining 3 ½ cups broth, carrots, and bay leaves into slow cooker.  Nestle browned chicken with any accumulated juice into slow cooker.  Cover and cook until chicken is tender, about 4-6 hours on low.

Transfer chicken to cutting board and let it cool slightly.  Shred into bite-size pieces.  Let stew settle for a few minutes, then remove any fat from surface.  Discard bay leaves.

Stir shredded chicken, peas, and parsley into stew, and season with salt and pepper to taste.  Add additional broth if needed.  Cover and cook on high until simmering (or transfer to large pot and bring to simmer over medium heat).

For the dumplings:

Whisk flour, baking powder, and salt together in large bowl.  Microwave milk and butter together until warm, about 1 minute, then whisk to melt butter.  Stir milk mixture into flour mixture until just smooth and incorporated.

Drop golf ball-size dumplings on top of simmering stew.  Cover and cook until dumplings have doubled in size, 25 to 35 minutes.  Serve.

Saturday, April 21, 2012

Salted Oatmeal Cookies


This past Sunday was Greek Easter, one of the tastiest holidays out there.  By the time we arrived delicious Greek appetizers like spanakopita were already laid out and waiting to be devoured.  Dinner consisted of a variety of meats, as well as the famous Greek dish pastitsio, grilled vegetables...need I go on?  You would think that after all that food no one would have room for dessert, but that's just crazy talk.  I knew when I was looking for a recipe that it had to be something on the lighter side.  Marshmallow-topped brownies need not apply.

I had oatmeal left over from last week's recipe so I went on a search for something different to do with it.  I stumbled across this recipe from the Washington Post which is based on a beloved cookie from Teaism, a tea house in D.C.  I'm a big proponent of the sweet-salty combo so I jumped at the chance to work that into a cookie.  The original recipe didn't call for chocolate chip cookies but how can you go wrong adding chocolate?  I ended up splitting the dough in half and adding chocolate chips to only some of the cookies, but next time I think I'd make them all chocolate chip.

This cookie was gobbled up by my family, as well as my co-workers.  Everyone commented on how much they loved the mix of salty and sweet and I have to agree. If you're looking for a spin on a traditional oatmeal cookie, I can't recommend this highly enough.


Salted Oatmeal Cookies (adapted from TheWashington Post)

12 tablespoons (1 1/2 sticks) unsalted butter, at room temperature
1 cup light brown sugar
1/2 cup sugar
1 teaspoon baking powder
1/4 teaspoon baking soda
1/4 teaspoon ground cinnamon
2 large eggs
1 teaspoon vanilla extract
1 3/4 cups flour
2 cups rolled oats (not quick-cooking)
Coarse sea salt, for sprinkling
½ cup semi-sweet chocolate chips (optional)

In the large bowl of a stand mixer fitted with the paddle attachment, beat the butter for a few minutes on medium-high speed until light and fluffy. Scrape down the sides of the bowl and add the sugars, baking powder, baking soda and cinnamon, beating until the mixture is well blended. Reduce the speed to medium and add the eggs and vanilla extract, mixing until well incorporated. Reduce the speed to low and add the flour and oats, scraping down the sides of the bowl as necessary and mixing just until they are incorporated. At this point I put half the dough into a bowl, while I added chocolate chips to the other half and mixed briefly.  Cover the bowls with plastic wrap and chill the dough for at least an hour before baking.

Preheat the oven to 375 degrees. Line 2 large baking sheets.  Scoop the dough into balls and place about 2 inches apart on the baking sheet. Sprinkle sea salt generously on top of each ball of dough, as you would sugar. Bake 1 sheet at a time for 11-13 minutes or until the cookies are puffed and beginning to turn golden, being careful not to overbake. (The cookies should have a tender interior.) Transfer the cookies, still on the parchment paper, to a wire rack to cool completely.

Makes about 36 cookies.

Tuesday, April 3, 2012

Banana Chocolate Chip Oatmeal Cookies


Every once in awhile I try to make something on the healthier side.  You can only eat so many marshmallow-laden treats (though I’m sure Dennis would disagree).  I knew I wanted to do something banana-based, so when I stumbled upon a recipe for Banana Chocolate Chip Oatmeal Cookies I knew I had found a winner.

If you like oatmeal cookies then I think you’ll really enjoy these.  They have that chewiness that you expect from an oatmeal cookie, with just a hint of banana.  Chocolate chips are always a welcome addition but you could leave them out or substitute something else (walnuts, peanut butter chips?).  I did wish these had a bit more banana flavor so I think you’d be fine using a banana and a half to amp up the banana flavor.  These make a great afternoon snack or maybe even a special breakfast treat.

Banana Chocolate Chip Oatmeal Cookies (from Two Peas and Their Pod)

1 ¼ cups all purpose flour
1 teaspoon baking soda
1/2 teaspoon salt
4 tablespoons unsalted butter, at room temperature
1/2 cup light brown sugar, packed
1/4 cup granulated sugar
1 teaspoon vanilla extract
1 large egg
1 large very ripe banana, mashed
2 cups old fashioned oats
1 cup semisweet chocolate chips

In a medium bowl, whisk together flour, baking soda, and salt. Set aside.

In a large mixing bowl, combine butter and sugars, mix until smooth. Add in vanilla extract and egg. Next, add the banana. Beat well.

Slowly add in flour mixture until just combined. Stir in oats and chocolate chips.

Drop cookie dough by heaping tablespoonfuls 2 inches apart onto lined baking sheets.  Bake at 350 for 12-15 minutes or until golden. Remove cookies from pans; cool completely on wire racks.

Makes about 2 ½ dozen cookies.

Sunday, March 18, 2012

Irish Soda Bread Cookies

Apparently I just can’t be trusted to plan ahead for holidays, as I woke up on St. Patrick’s Day and realized we had no Guinness in the fridge and no Irish Soda Bread in the freezer.  Whoops.  Luckily I came across this recipe for Irish Soda Bread Cookies, which was not only a breeze to make, but also provided me with some extra cookies to bring into work on Monday.  As Dennis put it, “These taste just like Irish Soda Bread, only in cookie form.”  I couldn’t have said it better myself. 

Irish Soda Bread Cookies (adapted from AllRecipes)

2 cups all-purpose flour
3/4 cup white sugar
1/2 teaspoon baking soda
1/4 teaspoon salt 
1/2 cup butter
3/4 cup raisins
1/4 cup buttermilk (I never have buttermilk so I just used ¼ cup milk combined with just shy of a teaspoon of lemon juice.  Let it sit for about 5-10 minutes)
1 egg

Preheat oven to 350 degrees.
Combine dry ingredients in a mixing bowl. With a pastry blender, cut in butter until mixture resembles coarse meal. Stir in raisins.

Mix in beaten egg. Pour in milk and mix with a fork to make a soft dough (may need a little more milk).

Scoop out teaspoonfuls of dough and put onto lined cookie sheet. 

Bake for 11 to 13 minutes or until slightly browned.

Thursday, March 8, 2012

Apple Pie Muffins


At our favorite restaurant one night Dennis and I had the most amazing apple cake.  I thought about trying to find a similar recipe to make for breakfast out but thought a muffin would make more sense (not that there’s anything wrong with eating cake for breakfast).  Muffins are such a great breakfast food since you can freeze whatever you don’t eat, then take one out whenever you want some home baked goodness.

I gave one of these to Dennis warm out of the oven and was hoping he’d give me a bite.  Apparently that wish was in vain because he gobbled the muffin down in about 4 bites.  As I gazed wistfully at the few crumbs left over he assured me that the muffin was very, very good.  So at least there’s that.

Apple Pie Muffins (From AllRecipes.com)

2 1/4 cups all-purpose flour
1 teaspoon baking soda
1/2 teaspoon salt
1 egg
1 cup buttermilk (or 1 cup milk combined with 1 T lemon juice)
1/2 cup butter, melted
1 teaspoon vanilla extract
1 1/2 cups packed brown sugar
2 cups diced apples (about 1 large apple.  I used Granny Smith and would recommend using a tart variety)

1/2 cup packed brown sugar
1/3 cup all-purpose flour
1 teaspoon ground cinnamon
2 tablespoons butter, melted

Preheat the oven to 375 degrees. Grease a 12 cup muffin tin or line with paper muffin cups.

In a large bowl, stir together 2 1/4 cups flour, baking soda and salt. In a separate smaller bowl, mix together the egg, buttermilk, 1/2 cup melted butter, vanilla and 1 1/2 cups of brown sugar until sugar has dissolved. Pour into the flour mixture and sprinkle the diced apple into the bowl as well. Stir just until everything is blended. Spoon into the prepared muffin tin, filling the cups about ¾ full.

In a small bowl, stir together 1/2 cup of brown sugar, 1/3 cup flour and cinnamon.
Drizzle in 2 tablespoons of melted butter while tossing with a fork until well blended. Sprinkle this over the tops of the muffins.

Bake for 25 minutes in the preheated oven, or until the tops of the muffins spring back when lightly pressed.

Tuesday, February 28, 2012

Chocolate Surprise Cookies


I don't know why I even ask Dennis what he wants for a weekly treat because inevitably his response involves chocolate or marshmallows.  I thought I had exhausted most of the possibilities to put these two flavors together, but when I saw this recipe from Martha Stewart I couldn't resist trying it out.

This recipe might look a bit complicated (I had a bad experience with frosting once) but it’s fairly simple and the final result is a knockout.  I worried that the cookie might be too sweet, but it provides a perfect contrast to with the marshmallow and chocolate frosting.  I love the fact that this recipe can be adapted to your tastes also.  If you don’t want marshmallows, maybe throw in a peanut butter cup or Hershey kiss.  They are called Surprise Cookies after all!

Chocolate Surprise Cookies (from Martha Stewart)

1 3/4 cups all-purpose flour
3/4 cup Dutch-process cocoa powder
1/2 teaspoon baking soda
1/2 teaspoon salt
1/2 cup (1 stick) unsalted butter, softened
1 cup sugar
1 large egg
1/2 cup milk
1 teaspoon pure vanilla extract
12 large marshmallows, cut in half horizontally

Chocolate Frosting for Surprise Cookies:

2 cups confectioners' sugar
4 tablespoons (1/2 stick) unsalted butter, melted and cooled
1/4 cup Dutch-process cocoa powder
1/4 cup milk
1/4 teaspoon pure vanilla extract

Place confectioners' sugar in a medium bowl. Whisk in butter and cocoa powder. Add milk and vanilla, and whisk until well combined.

Preheat oven to 375 degrees. In a medium bowl, whisk together flour, cocoa powder, baking soda, and salt; set aside.

Cream together butter and sugar until light and fluffy, about 2 minutes. Add egg, milk, and vanilla, and beat until well combined. Add reserved flour mixture; mix on low speed until combined.

Using a tablespoon or cookie scoop, drop dough onto ungreased or lined baking sheets, about 2 inches apart. Bake until cookies begin to spread and become firm, 7 to 9 minutes.

Remove baking sheets from oven, and place a marshmallow, cut-side down, in the center of each cookie, pressing down slightly. Return to oven, and continue baking until marshmallows begin to melt, 2 to 2 1/2 minutes. Transfer cookies to a wire rack to cool completely before frosting.
Spread about 1 tablespoon of frosting over each marshmallow, starting in the center and continuing outward until marshmallow is covered.

Monday, February 13, 2012

Brownie Roll-Out Cookies

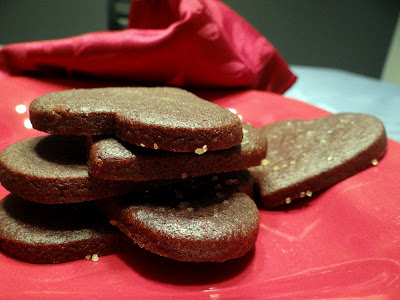
The Thursday before Valentine’s Day I realized I had no heart cookie cutters.  Uh-oh.  Luckily my wonderful husband didn’t balk at paying for extra-fast shipping so I could have them by this weekend.  Of course he knew what his reward would be, a batch of cookies baked up just in time for Valentine’s Day.

Roll-out cookies bring back memories of Christmas and rolling out sugar cookies with my Mom.  Those cookies were typical sugar cookies: crispy, buttery, perfect topped with some sprinkles and dunked in milk.  These cookies are the opposite of those, cakey and moist with a deep chocolate flavor.  I topped some with turbinado sugar to give them a bit of crunch which Dennis said he appreciated.  The best thing about this recipe is that it’s adaptable for any holiday (or lazy weekend).  Happy Valentine’s Day!

Brownie Roll-Out Cookies (adapted from Smitten Kitchen)

3 cups all-purpose flour
1/2 teaspoon salt
1/2 teaspoon baking powder
1 cup butter, softened
1 1/2 cups sugar
2 large eggs
1 teaspoon vanilla extract
2/3 cup unsweetened cocoa
Turbinado sugar or sprinkles (optional)

Whisk dry flour, salt and baking powder in bowl and set aside. Mix butter, sugar, eggs, vanilla and cocoa in mixer. Gradually add flour mixture, and mix until smooth. Wrap in plastic and chill for at least one hour.

Preheat oven at 350 degrees. Roll out cookie dough on floured counter or Silpat (I found rolling it out on the Silpat much easier – you just have to do the dough in batches to fit it on the mat). Cut into desired shapes.  Top cookies with turbinado sugar or sprinkles if you so desire.  Bake on a lined baking sheet for 8 to 11 minutes, until the edges are firm and the centers are slightly soft and puffed.

Transfer to a wire rack to cool.

Saturday, January 28, 2012

Granola S'mores Bars


It's easy to look through my past posts and see a theme with many of them. Any recipe that incorporates marshmallows and chocolate is put at the top of the to-do pile, and usually with great results. This week's recipe was no different.

The recipe takes the basic elements of s'mores but puts them into an easy to eat treat, no campfire required. The addition of oats gives the bars a nice crunch and also helps balance the sweetness of the marshmallows. I'm always a bit nervous bringing my treats into work (such pressure!) But these went over like gangbusters. Not only were all the bars eaten by the second day, but my boss said they were one of his favorite treats that I've brought in. I hope he remembers that when it's time for my yearly review.

Granola S'more Bars (from King Arthur Flour Baking Companion)

6 tablespoons unsalted butter
1/4 cup firmly packed brown sugar
6 tablespoons golden syrup
2 1/4 cups rolled oats
1/2 cup flour
1/2 teaspoon salt
1 cup graham cracker crumbs
1 cup semi-sweet chocolate chips
1 1/4 cups mini marshmallows

Preheat oven to 350 degrees.

In a medium saucepan over medium heat, melt and stir together the butter, sugar, and syrup, cooking until the sugar has dissolved.  Stir in oats, flour, salt and graham cracker crumbs.

Press about 3/4 of the mixture into a lightly greased 9x9 pan.  Let cool completely.  Sprinkle the chocolate chips evenly over the top, then the marshmallows.  Top with remaining crust mixture.  Bake the bars for 15 to 20 minutes.  Remove from the oven and let them rest for 20 minutes, then cut into squares while still slightly warm.